Posts

Curtain Tutorial

Image
Curtains are probably my favorite thing to make. Weird, eh? I think its because I never use a pattern, I just measure the window and go. Its fun to think up the style in my head and make it come out my hands! I am in the progress of making curtains for our new bathrooms. I have one done, and have the other all cut out. Here is a little tutorial on what I did: Just so you know where I am going with this, here is the style curtain I made: I just measured how long I wanted the curtain on the outside edges, and how long I wanted the middle to be. Then I cut diagonally between these two points. I left allowance for the top ruffle as well. This is a pretty large window, so had a 2” ruffle on top of the curtain rod. All total, with the bottom hem as well, I had about 6” hem allowance added to the length of the curtain. I cut two of these to make two triangle-shaped pieces for main part of the curtain. I also cut a rectangular piece for the middle that was the same length as the shortest s...

Organizing Challenge

Image
Ever since I became passionate about this getting-my-room-organized thing , I have been reading the blog, I Heart Organizing . Seriously, this woman’s amazing. She is one of the ones that hyped me up about organizing in the first place. And she is oh-so-practical and fun! Every month, she issues a month-long challenge in organizing and planning one area of her life, and invites all her readers to join in. Last month was photo organization. This month is putting together a household binder . I don’t have many photos, and they already were pretty much organized anyway, thanks to iPhoto, so I did not join in that challenge. I did, however, decide to join in creating my own planning binder system. Ok, so I know that really I don’t have much of a household to organize. But, I have not previously found a great dayplanner that functions as an all-in-one place for me to keep my life organized. I have tried several ways and none of them have been “it.” So I decided to try this out, as there...

More Organizing

Image
I did a little more organizing this week. I had had my eye on this for a while... ...but it was more moola than I wanted to pay. I kept checking, and sure enough, the price went down! Happy dance! I planned to use it to store my toothbrush and paste, combs and brush, makeup, hair clips, etc. But there is a lot more room in it! So (happily!) I get to organize more and put more in it! I did some cleaning out and some moving around to try to find exactly what would work for me. One thing I’m not too sure about it my makeup. I usually stored it like this: In the green pouch is my daily makeup, and in the blue pouch is more eye shadows and such. It worked well. But I thought I’d try it like this: Very unorganized. But for some reason, I am liking it this way. It is easy to see and grab what I need. And let me tell you, when you are as blind as I am, knowing where everything is and being able to recognize it is important. So yes, it is very unorganized, but I think it may be what work...

Note To Self

Like I said in this post , I decided to make most of my Christmas gifts this year. Happy to announce that the end is in sight! Which is a good thing, because so is Christmas. In the process, tho, I learned a great lesson I’d like to share with all of you. Especially the ones out there that sew. You’ll appreciate this most. Don’t ever buy pre-cut cloth. Now, for some of you that may be a no-brainer. I probably would have never done it either, until I moved to Canada. Up here, the buying cloth thing is way different. For one thing, most fabric is priced between $8-10 a meter. A meter is just a little less than a yard. .9144 of a yard, if you wanted to know exactly. Translate that into English: EXPENSIVE!!! And this is coming from the girl who broke out in hives when she had to pay over $2 a yard in the States. The other thing is that up here pre-cut fabric is way more common than in the States. In fact, our Walmart here doesn’t have any bolts any more, its all pre-cut. There goes...

Making Chair Cushions Part 3

Image
Did you miss the other parts of this tutorial? You can read part 1 here and part 2 here. Well, here we are with the final part of this cushion tutorial. Personally the buttons were my favorite part. They just are so easy and come out so cute! You can buy the shells of these buttons at Walmart or any craft store. They come in several sizes, so pick whichever you prefer. I used 3/4” for these. I really wanted 1” ones, but our Walmart wasn’t carrying them any more. Bummer. To turn these buttons into beautifully matching masterpieces: 1. Cut out a circle of fabric for each button that is 1” bigger than the button. 2. Spray lightly with water. When it dries, it shrinks slightly, which makes for a nice, smooth button. 3. Center one circle of fabric over the button-maker. Place button shell over the opening, and push all the way in. 4. Tuck edges of fabric into the button shell and place back of button on top of this. Make sure the loop is facing up, or else you won’t have a way t...

Making Chair Cushions Part 2

Image
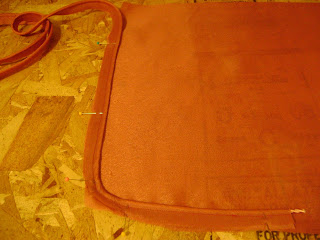
Well, here we are with part two: cutting out your cushion and sewing it all together! Unfortunately, I don’t have any pictures of the cutting out part, so you won’t get to see my mad cutting skills. :) but I will do my best to explain without pictures. Oh, and in case you missed Part 1 of this mini-series, which was how to make the cording, you can read it here . Cutting out your cushion: Cut cushion front and back whatever size you want, plus the depth measurement plus 1”. The depth measurement is necessary if you are making a box pillow/cushion, which I did. Fold front piece into fourths with corners together. Mark a point halfway between the corner and the fold on each open side. So you should have two points you mark. At the open corner, mark a third point that is 1/2” from each edge. Trim fabric from the point on the side to the point on the corner. Repeat on the other open side. Unfold the front and use it to trim the back piece in the same way. This step eliminates “dog-ea...

Making Chair Cushions Part 1

Image
Here is the first of a three part tutorial on making chair cushions. I was asked to make these by a lady in our church here. I had never done it before, so it was certainly a learning experience! It is so exciting to see the finished product. I will warn you though, its a very tedious and time-consuming process. I could certainly not just whip these up in a few hours. It took a lot of time . But well worth it! This first part is going to be how to make the matching cording to go around the edges. Basically any chair pad or decorative pillow has this cording around the seam. It is super easy to make your cording out of the fabric you are using. Or you can use a contrasting color. Either way, it is a great finish for your cushions. Before I go on, I must give the credit for some of these instructions to a book that I followed. My Grammie gave me a series by SINGER, called the Singer Sewing Reference Library . The book I used was Sewing For the Home. This book contains general directions ...