How To: Shorten Sleeves with a Lining
I do a lot of different sewing projects for people, and learn a lot of new things along the way. Today I thought I'd show you how to shorten sleeves of a women's blazer (or any sleeve that is lined). It is easy, even if you don't call yourself a seamstress, you can do it too!

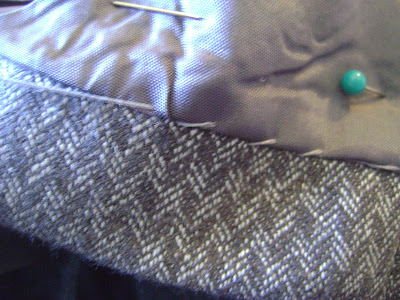
Here is the sleeve before I did anything to it:


See how the lining is folded over the seam? There is a little “give” in the lining to things don’t get bunched up in there while the garment is being worn. That is important, so I will be duplicating it in my new cuff!
Use a seam ripper to carefully rip out the stitches that hold the lining and the sleeve together. This will expose the raw edges of both layers.


Fold the sleeve over to the desired length. I made these 1” shorter, so I used the line left from the previous fold to measure.

Press sleeve to make this a permanent fold.
**Note: I read recently that water with a little white vinegar will take that other fold line away when doing a project like this. Just spray so the fabric is slightly damp and then iron that crease away! I haven’t tried it yet, but I will the next time I have the opportunity!
Now, you know how long the sleeve will be. Lets make the lining match!
Measure 1” off your lining. I used the previous stitching marks as a guide.

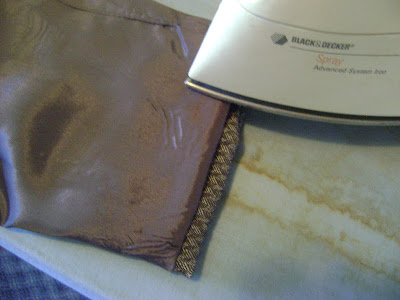
Pin the lining in place and press. Careful that your iron is not too hot!! I just shoved the sleeve up inside so it would be out of the way for this step.

Now it is time to pin the lining and the sleeve back together. Remember, you want the lining to have some slack, so pin the lining about 1” to 1½” down the sleeve. Refer to your “before” pictures to see how theirs was. :)

I just hand-sewed mine, since it was just a little sleeve hole, but you could always use a blind stitch to sew them together. Just so the stitches don’t show on the outside!

Once the entire seam is sewn, it is time to press the lining so it makes a little “flap” and covers up the stitching. Remember the “before?”
We want ours to look the same! Pull the lining down so it hangs over the stitches about a quarter of an inch. Then carefully iron it in place!
Ta-da!

And from the other side….

You can’t even tell the difference! It is really not a hard project, just one that takes some patience to achieve the right look and to make it lay correctly.
So there is a little sewing project that any of you can take on! Let me know if you try it and how it turns out!
Anyone else doing any sewing or crafting these days?

Here is the sleeve before I did anything to it:


See how the lining is folded over the seam? There is a little “give” in the lining to things don’t get bunched up in there while the garment is being worn. That is important, so I will be duplicating it in my new cuff!
Use a seam ripper to carefully rip out the stitches that hold the lining and the sleeve together. This will expose the raw edges of both layers.


Fold the sleeve over to the desired length. I made these 1” shorter, so I used the line left from the previous fold to measure.

Press sleeve to make this a permanent fold.
**Note: I read recently that water with a little white vinegar will take that other fold line away when doing a project like this. Just spray so the fabric is slightly damp and then iron that crease away! I haven’t tried it yet, but I will the next time I have the opportunity!
Now, you know how long the sleeve will be. Lets make the lining match!
Measure 1” off your lining. I used the previous stitching marks as a guide.

Pin the lining in place and press. Careful that your iron is not too hot!! I just shoved the sleeve up inside so it would be out of the way for this step.

Now it is time to pin the lining and the sleeve back together. Remember, you want the lining to have some slack, so pin the lining about 1” to 1½” down the sleeve. Refer to your “before” pictures to see how theirs was. :)

I just hand-sewed mine, since it was just a little sleeve hole, but you could always use a blind stitch to sew them together. Just so the stitches don’t show on the outside!


Once the entire seam is sewn, it is time to press the lining so it makes a little “flap” and covers up the stitching. Remember the “before?”
We want ours to look the same! Pull the lining down so it hangs over the stitches about a quarter of an inch. Then carefully iron it in place!

Ta-da!

And from the other side….

You can’t even tell the difference! It is really not a hard project, just one that takes some patience to achieve the right look and to make it lay correctly.
So there is a little sewing project that any of you can take on! Let me know if you try it and how it turns out!
Anyone else doing any sewing or crafting these days?


Great job. Going to try this on my blazer!!!
ReplyDeleteYay! Hope it goes smoothly for you...let me know if you have any questions! =)
DeleteThanks for the tutorial. I was able to shorten my sleeves with confidence!
ReplyDeleteOh yay, that makes me so happy!! =)
DeleteThanks for the tips. I really liked seeing the pictures they made the whole process easy and informative.
ReplyDeleteThanks so much! I just found a gorgeous high end fitted skirt suit at the Goodwill for $10. It fits as though tailor made - except that the sleeves are too long. Your instructions and pictures give me the confidence to try this alteration myself.
ReplyDeleteI did it! I did it! Yay! Thank you for your easy to understand tutorial and photos. On extra step I took was to baste the lining and sleeve together about 8 inches up the sleeve before I undid the stitching - just to keep the two layers lined up through the process.
ReplyDeleteYay, I'm so glad! Good for you! I love the extra step you added - great tip!
DeleteGreat tutorial. Thanks! You don't talk about trimming the sleeve or the lining. Did you trim them?
ReplyDeleteNope, sure didn't! If you are shortening the sleeve quite a bit, you would probably want to trim off the extra, but if it is just a little, I didn't see the need to. Thanks for asking! =)
DeleteMany thanks for this method, I will try it. I admire your blog. Hello from a Colombian in Europe. Freddy
ReplyDeleteGREAT TUTORIAL!!! I just shortened two jackets sleeves and lengthen two jacket sleeves. Sure did turn on a new light of confidence, in my sewing, when I did it.
ReplyDeleteGood for you! =)
DeleteLove this explanation, makes it really easy. Thank you!!!!
ReplyDeleteYou are welcome! =)
DeleteLoved your tutorial on hemming sleeves with lining, but what about a coat sleeve that has a fold over on the outside of the cuff with a button?
ReplyDeleteI'm glad you asked! It is hard to say for sure without seeing the coat myself, but I would say you should take off the cuff, shorten the sleeve, and then re-attach the cuff. Hope that helps!
DeleteThanks for this clear example. I may try to shorten a couple of new jackets myself. I'm handy with a needle, but needed this guide. Happy Easter!
ReplyDeleteYou are welcome, hope it helps! Let me know if you have any questions once you dive in. Thanks for commenting, and Happy Easter to you, too! =)
Deletethanks! this will definitely come handy. what tailors ask for to do this in my area is ridiculous! i will try it on my 5 suits lol
ReplyDeleteHope it works for you!! Good luck! =)
DeleteThanks. I didn't know how to get the lining back after I shortened the sleeve until I read your tutorial, but I didn't have time to hand sew before headed off the business trip. So I will get at it this weekend. For other readers who had significant suit sleeve to hem (I took mine up 2.5 inches): you may consider ironing a new strip of interfacing if the original isn't at your new fold line. It makes a nice stiff edge.
ReplyDeleteJust wanted to say thank you. I used your tutorial to shorten my daughter's school blazers - you made it very easy! (from the UK)
ReplyDeleteThank you so much for this great tutorial! I am petite and the arms of pretty much everything I buy are too long. My boyfriend just gave me this beautiful new coat for my birthday and after reading your method I feel confident I can tackle the sleeves shortening myself :)
ReplyDeleteI'm really thankfull for this post. It made shortening sleeves way easier than I tought it will be, and faster too :D.
ReplyDelete