Sewing for Those who {think they} Can't: My Sewing Toolbox
My grandparents gave me my first sewing machine when I was about 13 years old, with the promise of sewing lessons from my Grammie. I still use that sewing machine almost daily! I am ever-so-grateful to her for those invaluable lessons - I never dreamed that I would be running my very own handmade shop because of it!
At my very first sewing lesson, my Grammie gave me a kit she had put together of sewing essentials...things you must have to begin your sewing career! So whether you are making sewing your life’s calling, or just putting together a simple sewing kit that will get your mending done, this list is for you. These are the items you simply can’t live without!

*********************************************************************************************************
Scissors

>Regular shears - this may be a no brainer, but keep those babies separate and ONLY USE THEM FOR SEWING! Nothing dulls your shears faster than using them on paper, so have a pair that are set apart just for fabric and thread. I also like to have a small pair to clip threads, they are a little more convenient around the sewing machine.
>Pinking shears - when you cut fabric with these, it keeps things from getting all frayed. I don’t find that I use mine much because I have a serger, but you’ll want them for cutting out pieces of cloth.
>Rotary cutter - if you are going to be mostly sewing clothes, you probably won’t need a set of these. But if you plan to do quilts or something else with lots of straight lines, these babies will take loads of time off your prep time. Lets hear one for time savers!
*********************************************************************************************************
Needles

>Machine needles - generally these come in a package like those seen above. There are different kinds of sewing machine needles, but these 80/12 ones are the “normal” ones for general sewing.
>Needles for hand sewing - just a basic pack of assorted sewing needles will do the trick
*********************************************************************************************************
Pins

>Straight pins - You’ll want both longer ones and shorter ones, all with colorful round heads. These are much easier to work with than the small, all silver ones.
>Safety pins - I use these primarily to turn things inside out. Some day I’ll show you how I do that. :)
>Pincushion - in the very first picture, you can see I own one of those tomato pin cushions that every seamstress has. Seriously, I think it is written in the sewing code of ethics somewhere. The truth? I don’t ever use mine. I prefer to keep my pins in a small flat container so I can easily grab some, or in a flat-bottomed pin cushion. I find that the tomato one tends to roll away when you try to stick your pins inside! So yes, I own one...but don’t use it. Do whatever you want with that information.
Here is another secret tip about straight pins: I kept mine for years in a small container with a magnet in the bottom. It really helped keep those stray pins from getting away. {and they actually do sell magnetic pin cushions, so the idea is not original with me.} After a few years of storing them that way, the pins themselves started acting like magnets, which is what happens to metal that is stored by magnets. So now they stick to each other, grab on to my scissors, and anything else that is metal. This is so helpful! It really keeps them from rolling around so easily and falling on the floor...which is kind of like a “safety first” measure since Judah plays on my floor quite often.
{How many times did I say “magnet” in that sentence? Magnet, magnet, magnet…}
*********************************************************************************************************
Measuring devices
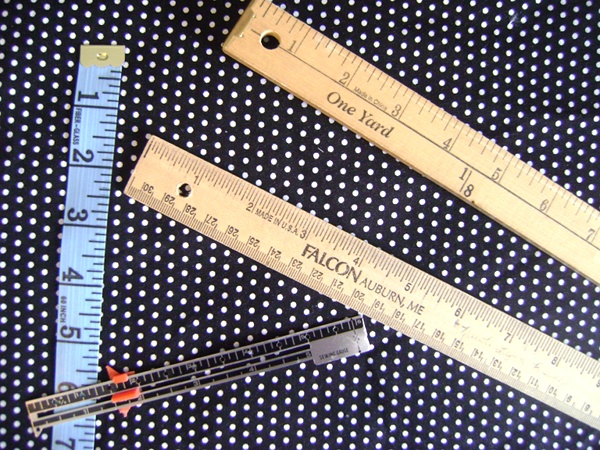
You will use any or all of the following items, depending on what kind of sewing you are doing:
>yardstick
>ruler
>measuring tape
>6” ruler - I wasn’t sure what this was called, but it is that small ruler in the picture above. This is great for measuring hems and smaller things.
*********************************************************************************************************
Other Sewing Extras

>Chalk or marking pens - chalk is my favourite thing to use to mark on fabric with, because it brushes right off when you are done! Pictured here is a chalk pencil from the craft section, but just a regular ‘ol piece of chalk works fine.
>Seam ripper - you will need this. Promise.
>Fray check - great for sealing the ends of ribbons, ties, or any area that might fray and cause a problem.
>Quality thread - I have found that buying quality thread makes a huge difference in how well my sewing machine runs, and how well the item holds up. I typically use Coats and Clark or Gutermanns. (Gutermanns has a lot more color choices, which I love)
For your sewing machine, you also must have small screwdrivers and machine oil. Some day, we’ll talk about oiling your machine and keeping it in tip top shape.
*********************************************************************************************************
There is my "staples list" that I keep near my sewing machine at all times! If you don't machine sew, you can pop all of these items in a pretty basket or bin, and use it for mending and repairs. It is a necessary thing to have on hand! It would also make a great bridal shower gift!
What are your #1 tools for crafting or sewing? Did I leave anything out of this list? Any topics you'd like to see my cover in future sewing lessons?
Linking up with: Threading my Way

At my very first sewing lesson, my Grammie gave me a kit she had put together of sewing essentials...things you must have to begin your sewing career! So whether you are making sewing your life’s calling, or just putting together a simple sewing kit that will get your mending done, this list is for you. These are the items you simply can’t live without!
*********************************************************************************************************
Scissors
>Regular shears - this may be a no brainer, but keep those babies separate and ONLY USE THEM FOR SEWING! Nothing dulls your shears faster than using them on paper, so have a pair that are set apart just for fabric and thread. I also like to have a small pair to clip threads, they are a little more convenient around the sewing machine.
>Pinking shears - when you cut fabric with these, it keeps things from getting all frayed. I don’t find that I use mine much because I have a serger, but you’ll want them for cutting out pieces of cloth.
>Rotary cutter - if you are going to be mostly sewing clothes, you probably won’t need a set of these. But if you plan to do quilts or something else with lots of straight lines, these babies will take loads of time off your prep time. Lets hear one for time savers!
*********************************************************************************************************
Needles
>Machine needles - generally these come in a package like those seen above. There are different kinds of sewing machine needles, but these 80/12 ones are the “normal” ones for general sewing.
>Needles for hand sewing - just a basic pack of assorted sewing needles will do the trick
*********************************************************************************************************
Pins
>Straight pins - You’ll want both longer ones and shorter ones, all with colorful round heads. These are much easier to work with than the small, all silver ones.
>Safety pins - I use these primarily to turn things inside out. Some day I’ll show you how I do that. :)
>Pincushion - in the very first picture, you can see I own one of those tomato pin cushions that every seamstress has. Seriously, I think it is written in the sewing code of ethics somewhere. The truth? I don’t ever use mine. I prefer to keep my pins in a small flat container so I can easily grab some, or in a flat-bottomed pin cushion. I find that the tomato one tends to roll away when you try to stick your pins inside! So yes, I own one...but don’t use it. Do whatever you want with that information.
Here is another secret tip about straight pins: I kept mine for years in a small container with a magnet in the bottom. It really helped keep those stray pins from getting away. {and they actually do sell magnetic pin cushions, so the idea is not original with me.} After a few years of storing them that way, the pins themselves started acting like magnets, which is what happens to metal that is stored by magnets. So now they stick to each other, grab on to my scissors, and anything else that is metal. This is so helpful! It really keeps them from rolling around so easily and falling on the floor...which is kind of like a “safety first” measure since Judah plays on my floor quite often.
{How many times did I say “magnet” in that sentence? Magnet, magnet, magnet…}
*********************************************************************************************************
Measuring devices
You will use any or all of the following items, depending on what kind of sewing you are doing:
>yardstick
>ruler
>measuring tape
>6” ruler - I wasn’t sure what this was called, but it is that small ruler in the picture above. This is great for measuring hems and smaller things.
*********************************************************************************************************
Other Sewing Extras
>Chalk or marking pens - chalk is my favourite thing to use to mark on fabric with, because it brushes right off when you are done! Pictured here is a chalk pencil from the craft section, but just a regular ‘ol piece of chalk works fine.
>Seam ripper - you will need this. Promise.
>Fray check - great for sealing the ends of ribbons, ties, or any area that might fray and cause a problem.
>Quality thread - I have found that buying quality thread makes a huge difference in how well my sewing machine runs, and how well the item holds up. I typically use Coats and Clark or Gutermanns. (Gutermanns has a lot more color choices, which I love)
For your sewing machine, you also must have small screwdrivers and machine oil. Some day, we’ll talk about oiling your machine and keeping it in tip top shape.
*********************************************************************************************************
There is my "staples list" that I keep near my sewing machine at all times! If you don't machine sew, you can pop all of these items in a pretty basket or bin, and use it for mending and repairs. It is a necessary thing to have on hand! It would also make a great bridal shower gift!
What are your #1 tools for crafting or sewing? Did I leave anything out of this list? Any topics you'd like to see my cover in future sewing lessons?
Linking up with: Threading my Way


I absolutely need one of those rotary cutters and a fabric pencil or marking pen. Thanks so much for sharing the tips!
ReplyDeletexo,
Jen
Oh yes, they are a necessity! Can't wait to see the sewing projects you tackle!! =)
DeleteI think you've covered everything for someone who is new to sewing, Nicole. I totally agree about that tomato (or is it a strawberry... LOL) pincushion. My daughter has one and it drives me batty when I try to use it as it rolls all over the place. I must make her a flat bottomed one.
ReplyDelete